> ## Documentation Index
> Fetch the complete documentation index at: https://docs.b-bot.space/llms.txt
> Use this file to discover all available pages before exploring further.
# Workflows
> Build, test, run, and publish Agent workflows
# Workflows
Workflows connect Agents, app actions, decisions, and human review in a visual automation. Open **Workflows** from the sidebar to view saved workflows or start a new one.
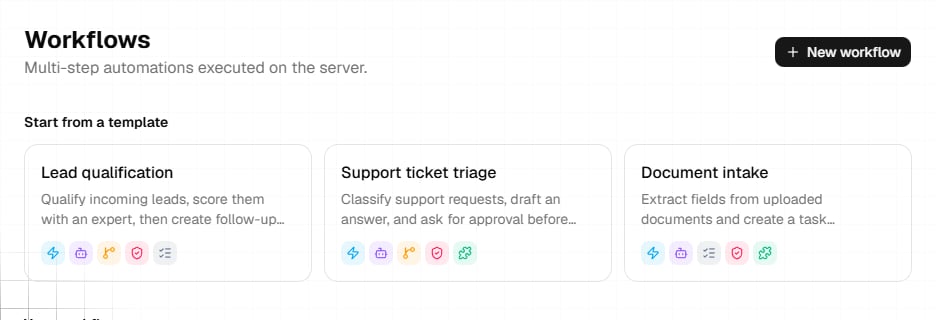 ## Start from the list or a template
The Workflows page shows:
* Starter templates for lead qualification, support ticket triage, and document intake.
* Saved workflows with their draft or active status, step count, and trigger type.
* **New workflow** for a blank workflow.
Selecting a template opens the builder with its steps already arranged. Selecting a saved workflow opens it for editing.
Start with the shortest path that proves the intended result. Add branches or integrations after that path succeeds.
## Build on the canvas
Add nodes from the palette and place them on the canvas. Connect one node's output handle to another node's input handle to define execution order and branches. Select a node to open its configuration panel.
B-Bot Hub supports these node types:
* **Trigger**
* **Agent step**
* **Action**
* **If condition**
* **Switch**
* **For each**
* **While loop**
* **Wait**
* **Merge**
* **Human approval**
* **Task update**
* **Stop**
Node settings vary by type. For example, an Agent step selects an Agent and prompt, while an Action selects a connected Agent, app connection, and action.
## Map data between nodes
Agent and Action nodes define input and output fields. Use the mapping editor to map each input to an output from an upstream node. Clear field names and structured Agent outputs make conditions, switches, and later mappings more reliable.
For branching nodes, connect the labeled output handles to the correct downstream paths. For loops, connect the loop path to the repeated steps and the completed path to the steps that follow the loop.
## Save, test, and inspect runs
Save the workflow as a draft. A saved workflow receives the ID required by runs and configured triggers.
Select **Test run**. The builder saves current changes first and queues a test execution.
Open **Runs** to review execution status and node details. Runs can wait for approval when they reach a Human approval node or an action that requires approval.
Select **Publish** to make the workflow active. Use **Unpublish** to return it to draft status.
## Configure triggers after saving
The trigger node supports these trigger types:
* **Manual run**
* **Schedule**
* **Webhook**
* **Polling**
* **App trigger**
After the workflow has been saved, open **Triggers** to create and manage operational triggers. You can add webhook triggers and schedule triggers with preset intervals, copy a generated webhook URL, enable or disable a configured trigger, and delete it.
Configured triggers are active only while the workflow is published.
Before publishing, test representative inputs against expected results. When diagnosing a failure, change one configuration element at a time and rerun the same input.
## Related guides
Connect Composio apps and MCP servers for Action and App trigger steps.
Learn how task execution and task workspaces operate.
## Start from the list or a template
The Workflows page shows:
* Starter templates for lead qualification, support ticket triage, and document intake.
* Saved workflows with their draft or active status, step count, and trigger type.
* **New workflow** for a blank workflow.
Selecting a template opens the builder with its steps already arranged. Selecting a saved workflow opens it for editing.
Start with the shortest path that proves the intended result. Add branches or integrations after that path succeeds.
## Build on the canvas
Add nodes from the palette and place them on the canvas. Connect one node's output handle to another node's input handle to define execution order and branches. Select a node to open its configuration panel.
B-Bot Hub supports these node types:
* **Trigger**
* **Agent step**
* **Action**
* **If condition**
* **Switch**
* **For each**
* **While loop**
* **Wait**
* **Merge**
* **Human approval**
* **Task update**
* **Stop**
Node settings vary by type. For example, an Agent step selects an Agent and prompt, while an Action selects a connected Agent, app connection, and action.
## Map data between nodes
Agent and Action nodes define input and output fields. Use the mapping editor to map each input to an output from an upstream node. Clear field names and structured Agent outputs make conditions, switches, and later mappings more reliable.
For branching nodes, connect the labeled output handles to the correct downstream paths. For loops, connect the loop path to the repeated steps and the completed path to the steps that follow the loop.
## Save, test, and inspect runs
Save the workflow as a draft. A saved workflow receives the ID required by runs and configured triggers.
Select **Test run**. The builder saves current changes first and queues a test execution.
Open **Runs** to review execution status and node details. Runs can wait for approval when they reach a Human approval node or an action that requires approval.
Select **Publish** to make the workflow active. Use **Unpublish** to return it to draft status.
## Configure triggers after saving
The trigger node supports these trigger types:
* **Manual run**
* **Schedule**
* **Webhook**
* **Polling**
* **App trigger**
After the workflow has been saved, open **Triggers** to create and manage operational triggers. You can add webhook triggers and schedule triggers with preset intervals, copy a generated webhook URL, enable or disable a configured trigger, and delete it.
Configured triggers are active only while the workflow is published.
Before publishing, test representative inputs against expected results. When diagnosing a failure, change one configuration element at a time and rerun the same input.
## Related guides
Connect Composio apps and MCP servers for Action and App trigger steps.
Learn how task execution and task workspaces operate.